Azure Backup Automation: Scheduling Best Practices
SMB guidance on scheduling, redundancy, tiered retention, cost optimisation and automating cloud backups with regular restore testing.

Losing data can cost businesses time, money, and trust. Azure Backup provides a reliable way to automate data protection for SMBs, removing the hassle of manual setups and ensuring backup policies align with business needs. Here's what you need to know:
- Backup Scheduling: Choose between daily backups (Standard Policy) or more frequent backups (Enhanced Policy, every 4–24 hours). Schedule backups during off-peak hours to minimise system impact.
- Storage Redundancy: Options range from basic LRS (for non-critical data) to GRS/GZRS for higher resilience. For UK businesses, GRS replicates data between UK South and UK West regions.
- Cost Management: Backup costs include protected instance fees and storage charges. Use tiered retention to lower costs - archive older data at a fraction of the price.
- Automation Tools: Use Azure PowerShell, CLI, or Runbooks to streamline backups and ensure consistency across environments.
- Testing Restores: Regularly test Cross-Region Restore (CRR) to validate recovery processes and meet compliance standards.
Quick Tip:
- Critical Workloads: Back up every 4–6 hours with Enhanced Policy.
- Non-Critical Systems: Daily backups, using Standard Policy, reduce costs.
By automating and optimising backups, you can safeguard critical data, manage costs, and ensure compliance with UK regulations.
Best Practices for Designing Backup Schedules
Matching Backup Policies to Workloads
To design effective backup schedules, it's essential to classify workloads based on their importance. Group your systems into tiers according to the potential business impact if they were lost.
| Workload Tier | Criticality | RPO Target | RTO Target | Recommended Policy |
|---|---|---|---|---|
| Tier 0 | Mission Critical | Seconds | Seconds | Active-active, multi-region |
| Tier 1 | Business Critical | Minutes | Minutes | Warm standby, Enhanced Policy |
| Tier 2 | Operational | Hours | Hours | Cold standby, Standard Policy |
| Tier 3 | Administrative | Hours | Hours/Days | Backup and restore, Archive Tier |
For Tier 0 and Tier 1 workloads, such as live databases or customer-facing applications, Azure's Enhanced Policy is ideal as it allows backups as frequently as every four hours. On the other hand, Tier 2 and Tier 3 systems can typically be backed up once daily under the Standard Policy, balancing cost and efficiency.
Once you've aligned your backup policies with workload tiers, the next step is selecting the right storage redundancy to ensure resilience.
Choosing the Right Storage Redundancy Option
Storage redundancy plays a critical role in balancing cost and data protection. It's important to decide on this setting before registering your first backup item, as it cannot be changed later.
| Redundancy Option | Durability | Regional Protection | Best For |
|---|---|---|---|
| LRS | 11 nines | No | Dev/test, non-critical workloads |
| ZRS | 12 nines | No | High availability with data residency |
| GRS | 16 nines | Yes | Mission-critical production workloads |
| GZRS | 16 nines | Yes | Maximum resilience across zones/regions |
For UK-based small and medium-sized businesses with strict data residency requirements, ZRS ensures data remains within a single region while still surviving zonal outages. For those requiring regional disaster recovery, GRS replicates data to Azure's paired region – for example, UK South data is replicated to UK West. If you enable Cross-Region Restore (CRR) on a GRS vault, it upgrades to RA-GRS, which adds extra costs.
Choosing the right redundancy option also helps determine how often backups should occur to meet your recovery needs.
Planning Backup Time Windows and Frequency
Running backups at the wrong time can impact system performance, so it's best to schedule them during off-peak hours – typically between 02:00 and 03:00 – when system load is minimal.
For larger environments with hundreds of virtual machines (VMs), avoid triggering backups for all VMs simultaneously. Instead, stagger the start times across multiple policies to distribute the load on network and storage resources.
Backup frequency should align with your Recovery Point Objective (RPO). For instance, a Tier 1 business-critical database might need backups every four to six hours, while a Tier 3 internal document store may only require weekly snapshots. This approach ensures both cost efficiency and effective recovery when needed.
[5] English | How to Create & Optimize Azure Backup Policies in Minutes
Cost-Effective Backup Scheduling for SMBs
Azure Backup Tiered Retention: Cost vs. Speed Comparison
How Azure Backup Costs Are Calculated
Azure Backup pricing includes two main components: a flat fee for Protected Instances and variable storage costs. The Protected Instance fee depends on the size of the workload. For example:
- Instances up to 50 GB cost £5 per month.
- Instances between 50 GB and 500 GB cost £10 per month.
- Workloads exceeding 500 GB are charged £10 for every additional 500 GB.
Storage costs vary based on the redundancy option chosen. For example:
- Locally Redundant Storage (LRS): Approximately £0.0224 per GB/month for the Standard tier.
- Geo-Redundant Storage (GRS): Roughly £0.0448 per GB/month, about double the cost of LRS.
- Read-Access Geo-Redundant Storage (RA-GRS): Around £0.0569 per GB/month when Cross-Region Restore (CRR) is enabled, with additional data transfer charges.
Backup schedules and data churn rates also impact costs. Frequent backups, like those using Enhanced Policies with four-hour intervals, lead to more snapshots. Similarly, high-churn workloads, such as databases, generate more incremental backup data compared to low-churn systems like file servers.
Balancing Cost Against Backup Performance
The speed at which you need to recover data influences the cost-performance balance. For instance:
- Operational tier snapshots: Provide nearly instant recovery but cost around £0.10 per GB.
- Vault-Standard storage: Offers recovery within minutes to hours at a lower cost of approximately £0.0224 per GB (LRS), making it suitable for medium-term retention.
For businesses needing regional disaster recovery, higher-cost redundancy options like GRS or GZRS may be worth the investment for critical workloads (Tier 0 and Tier 1). On the other hand, for non-critical systems such as development or administrative environments, LRS can cut storage costs by around 50%. Additionally, reducing Instant Restore snapshot retention from the default five days to two days can help lower premium disk snapshot expenses without significantly affecting recovery capabilities.
Using Tiered Retention to Reduce Costs
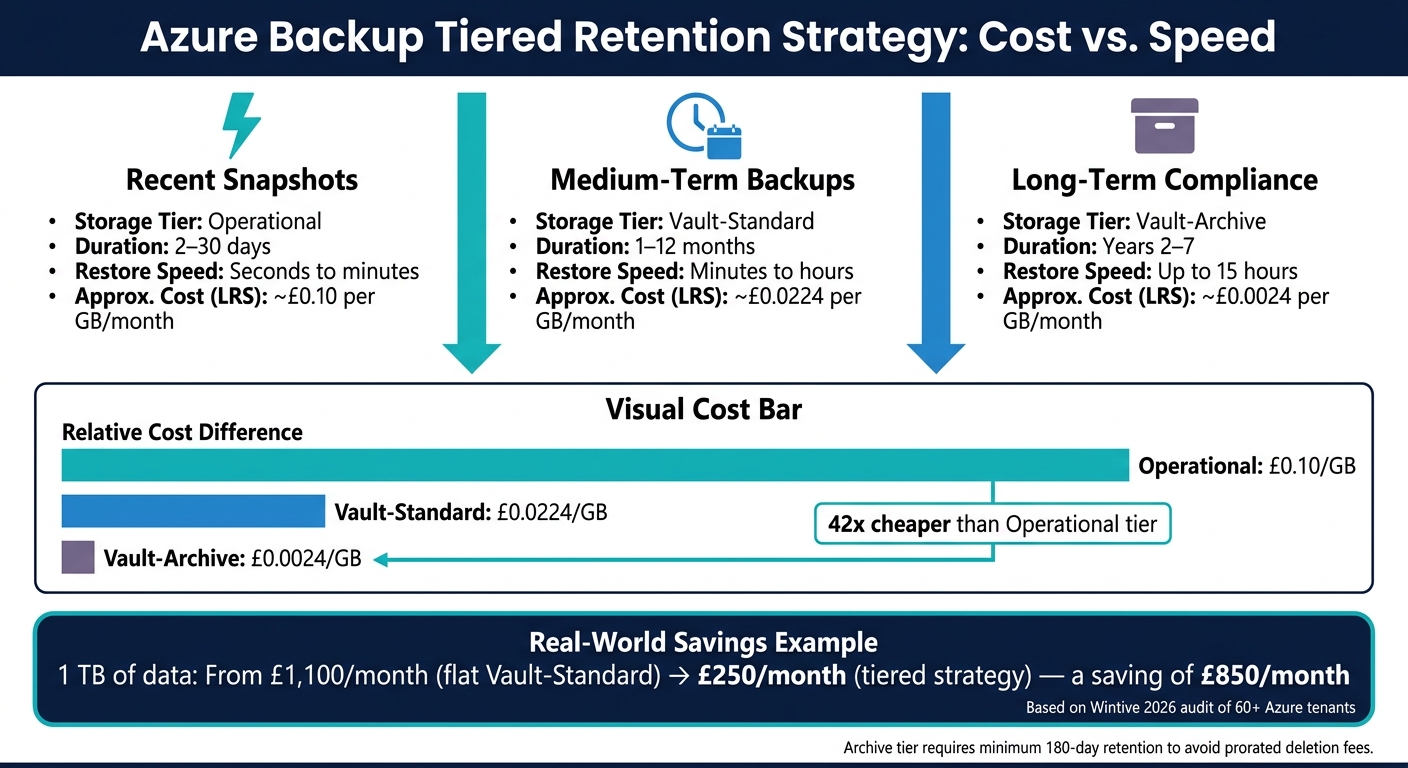
To manage long-term costs effectively, consider a tiered retention strategy instead of a flat retention policy. Storing all recovery points in Vault-Standard for seven years is a common but expensive approach. Instead, moving data through different storage tiers based on its age can result in substantial savings.
Here’s an example of a three-tier retention strategy:
| Retention Stage | Storage Tier | Typical Duration | Restore Speed | Approx. Cost (LRS) |
|---|---|---|---|---|
| Recent snapshots | Operational | 2–30 days | Seconds to minutes | ~£0.10 per GB |
| Medium-term backups | Vault-Standard | 1–12 months | Minutes to hours | ~£0.0224 per GB |
| Long-term compliance | Vault-Archive | Years 2–7 | Up to 15 hours | ~£0.0024 per GB |
The cost difference between Operational and Archive tiers is substantial. As noted in Wintive’s 2026 audit of over 60 Azure tenants:
"The vault-archive tier sits at £0.0024 per GB-month versus £0.10 operational - a 42x gap."
This audit also highlighted how a business with 1 TB of data could reduce its monthly backup costs from £1,100 to £250 by switching from a flat seven-year Vault-Standard policy to a tiered approach. This strategy involved keeping 30 days of Operational snapshots, 12 months in Vault-Standard, and six years in Vault-Archive. However, note that data stored in the Archive tier must remain for at least 180 days to avoid prorated deletion fees.
Careful planning of archive policies can help avoid unexpected costs. For more tips on managing Azure expenses, check out Azure Optimization Tips, Costs & Best Practices for advice tailored to SMBs.
sbb-itb-6ec400b
Setting Up Automated Backup Schedules in Azure
Configuring Backup Policies in Azure
When creating your Recovery Services vault, it’s crucial to set the replication type to Geo-redundant storage (GRS) right away. This setting becomes locked once you start protecting items, and changing it later requires deleting and recreating the vault, which can disrupt backups.
Azure provides two types of backup policies: Standard and Enhanced. Standard policies allow for one backup per day, making them suitable for simpler workloads. Enhanced policies, on the other hand, support more frequent backups (every 4, 6, 8, or 12 hours), extend instant restore snapshot retention up to 30 days, and can handle newer VM types like Trusted Launch VMs, Premium SSD v2, and Ultra Disks.
| Feature | Standard Policy | Enhanced Policy |
|---|---|---|
| Backup Frequency | Daily | Hourly (every 4–24 hours) |
| Snapshot Retention | 1–5 days | 1–30 days |
| Workload Support | Standard VMs | Trusted Launch VMs, Ultra Disks, Premium SSD v2 |
| Zone Resiliency for Snapshots | Not supported | Supported |
These policies form the backbone of efficient scheduling and cost management. Keep in mind that a single Recovery Services vault can support up to 1,000 Azure VMs, so plan accordingly.
Once your policy parameters are defined, the next step is to automate these settings across your environment for consistent application.
Automating Backups with Azure PowerShell, CLI, and Runbooks
Manually configuring backups through the portal can be tedious and error-prone, especially in environments with numerous VMs. Automating your backup policies ensures uniformity and saves time.
With Azure PowerShell, the process involves registering the Recovery Services provider, creating a vault, defining schedule and retention settings, and applying the policy to VMs. Key cmdlets include:
New-AzRecoveryServicesBackupProtectionPolicy– to create a backup policy.Enable-AzRecoveryServicesBackupProtection– to apply the policy to VMs.
Remember to specify backup start times in UTC, using 30-minute intervals.
Using Azure CLI, you can achieve similar results. Important commands include:
az backup vault create– to create a vault.az backup vault backup-properties set– to configure redundancy.az backup protection enable-for-vm– to assign a policy to a VM.
For more complex needs, such as on-demand or cross-subscription backups, you can use Azure Automation Runbooks to consolidate commands into reusable workflows. If you’re backing up encrypted VMs, ensure the Azure Backup service principal (App ID 262044b1-e2ce-469f-a196-69ab7ada62d3) has the required permissions (get, list, and backup) on the Key Vault.
Testing Cross-Region Restore Scenarios
Once your backup policies are automated, it’s essential to test cross-region restore capabilities to ensure resilience. Simply enabling Cross-Region Restore (CRR) doesn’t guarantee functionality. Without testing, your recovery objectives remain uncertain.
After enabling CRR on a GRS vault, it can take up to 48 hours for backup items to become available in the secondary (paired) region. The worst-case Recovery Point Objective (RPO) for the secondary region is 36 hours - this includes a 24-hour primary RPO and up to 12 hours of replication lag. This timeline is crucial for planning recovery processes for critical workloads.
To automate testing with PowerShell, use the -UseSecondaryRegion flag in the Get-AzRecoveryServicesBackupRecoveryPoint cmdlet to retrieve recovery points from the paired region. You can then restore them using the -RestoreToSecondaryRegion parameter in Restore-AzRecoveryServicesBackupItem. For SQL workloads, always perform restores to an alternate location during testing to avoid impacting production systems. Conduct quarterly restore drills in an isolated environment to verify recovery time objectives and provide documentation for audits.
Monitoring and Governing Backup Schedules
Tracking Backup Job Health with Azure Monitor
Azure's Resiliency dashboard gives you a real-time overview of backup job health across multiple vaults, subscriptions, and regions. This tool ensures you can keep track of your backup performance at a glance.
For more detailed insights, connect your Recovery Services vaults to a Log Analytics workspace by configuring diagnostic settings for each vault. This setup enables Backup Reports, which help you monitor job success rates, analyse storage usage trends, and identify workloads that haven't been backed up recently. Diagnostic data updates within 20–30 minutes, though some logs refresh every six hours. To customise your monitoring further, use Kusto Query Language (KQL) to create alerts tailored to specific scenarios, such as tracking failed backup jobs or monitoring storage consumption per item.
It's important to note that classic alerts for Azure Backup will no longer be supported after 31 March 2026. If you're still relying on these, transitioning to Azure Monitor Alerts is essential for uninterrupted functionality.
"Classic alerts for Azure Backup will be deprecated on 31 March 2026. We recommend you to migrate to Azure Monitor Alerts for a seamless experience." - Microsoft Learn
Here's a quick summary of the alert categories available in Azure Monitor for backup environments:
| Alert Category | Severity | Scenarios Covered |
|---|---|---|
| Security Alerts | Sev 0 | Deletion of backup data, disabling soft-delete, MUA disabled, hybrid security changes. |
| Job Failure Alerts | Sev 1 | Backup failures, restore failures, unhealthy workload extensions, unsupported backup types. |
These tools and alerts allow you to proactively manage your backup strategy and adapt it as your business needs evolve.
Reviewing and Adjusting Schedules Over Time
Backup schedules require regular updates to keep pace with changing workloads, retired virtual machines, and compliance needs. A quarterly review is a good practice to ensure your recovery objectives stay aligned with your operational priorities.
For UK-based operations, it's crucial to account for the country's time zones. Azure backup policies default to UTC, but UK workloads switch between Greenwich Mean Time (GMT) and British Summer Time (BST) during the year. To maintain consistency, use PowerShell to set the ScheduleRunTimezone parameter to "GMT Standard Time". This ensures your backup windows always fall during low-traffic hours, even when the clocks change. For instance, a backup scheduled for 02:00 UTC in winter will run at 02:00 GMT, but in summer, that same UTC time shifts to 03:00 BST, which might disrupt your operations.
When adjusting retention periods, remember that reducing retention will mark existing recovery points for pruning during the next cleanup job. On the other hand, extending retention ensures existing recovery points are preserved under the updated policy. Always plan reductions carefully to avoid losing critical recovery points.
As you refine these schedules, it's equally important to focus on securing your backup data in line with UK compliance standards.
Securing Backups and Meeting UK Compliance Requirements
A well-structured backup schedule must also prioritise data security and compliance. Start by enforcing Role-Based Access Control (RBAC). Assign roles like Backup Contributors for managing policies, Backup Operators for initiating restores, and Backup Readers for monitoring purposes. To further enhance security, implement Multi-User Authorization (MUA). This feature requires a second security administrator to approve destructive actions, such as disabling soft-delete or altering retention policies. This extra step helps prevent unauthorised data loss, particularly in scenarios involving rogue administrators.
With ransomware attacks on the rise, targeting backup repositories before encrypting production data, MUA is an essential safeguard. For businesses in regulated sectors like finance or healthcare, Azure Private Link ensures all backup traffic remains within Microsoft's private network, bypassing the public internet. If your organisation requires greater control over encryption, use Customer-Managed Keys (CMK) stored in Azure Key Vault to meet data sovereignty requirements.
Here’s a breakdown of key security measures and their compliance benefits:
| Security Measure | Function | Compliance Benefit |
|---|---|---|
| RBAC | Restricts access by role. | Ensures segregation of duties for UK data standards. |
| MUA | Requires a second admin to approve destructive tasks. | Prevents "rogue admin" data loss scenarios. |
| Private Link | Routes backup traffic through private networks. | Meets network segmentation requirements for finance/health. |
| CMK Encryption | Uses organisation-owned keys in Azure Key Vault. | Provides greater data sovereignty and security control. |
| Soft Delete | Retains deleted backups for 14 days at no extra cost. | Protects against malicious deletion attacks. |
Lastly, conduct quarterly restore drills using Cross-Region Restore to an isolated environment. Document the results as evidence for auditors, who increasingly prioritise proof of successful restores over mere backup completion.
"Auditors do not care backup ran - they care restore worked." - Wintive
Conclusion and Key Takeaways
Let’s recap the essential steps for building a solid Azure backup strategy that keeps your data secure and your business running smoothly.
First, having a well-structured Azure backup schedule is critical. Downtime can be incredibly costly - UK SMEs lose an average of £2,700 per hour due to IT downtime, and alarmingly, 60% of small businesses that lose their data shut down within six months. Despite these risks, 32% of UK SMEs still lack a formal backup strategy.
Azure offers a range of tools to help close this gap. Start by aligning your backup frequency with your Recovery Point Objective (RPO) and Recovery Time Objective (RTO). Use advanced backup policies to hit key recovery targets, and tier older data into the vault-archive tier (priced at £0.0015 per GB/month) to keep costs manageable. Automating tasks with PowerShell, CLI, or Azure Policy can also reduce human error, which is responsible for around 40% of data loss incidents in SMEs.
Security and compliance should be top priorities. Setting up Recovery Services Vaults to replicate data between UK South and UK West ensures compliance with UK GDPR while keeping your data within the country's borders. Features like Multi-User Authorization (MUA), soft delete, and immutable vaults add further layers of protection against unauthorised changes.
"Backup is only useful if the restore works, the recovery time is realistic, and the protected copy is still trustworthy when you need it." - ITU Online Editorial Team
Finally, don’t just assume your backups are working - test them. Conduct quarterly restore drills and maintain detailed documentation to ensure your recovery processes are reliable. For more insights on optimising Azure costs and improving resilience, check out the Azure Optimization Tips, Costs & Best Practices blog.
FAQs
How do I choose between Standard and Enhanced backup policies?
If you're looking for advanced backup options, Enhanced policies might be the way to go. They offer features like zone-redundant storage for Instant Restore snapshots, the ability to perform backups more often than daily, and support for Trusted Launch VMs, Ultra Disks, and Premium SSD v2. Additionally, Enhanced policies let you retain snapshots for up to 30 days.
On the other hand, Standard policies are better suited for basic backup needs. However, they don't include the advanced features found in Enhanced policies.
Important to note: Once a VM is protected under an Enhanced policy, it cannot be switched back to a Standard policy.
What redundancy should I choose if my data must stay in the UK?
To ensure data remains within the UK while maintaining resilience, consider using Geo-Redundant Storage (GRS) or Geo-Zone-Redundant Storage (GZRS) between UK South (London) and UK West (Cardiff). Azure automatically replicates data between these regions, aligning with UK GDPR requirements. This configuration safeguards against regional outages by enabling failover to the secondary region when necessary. For advice on managing costs and performance, check out Azure optimisation tips and best practices.
How can I estimate and reduce my Azure Backup costs?
To get an idea of Azure Backup costs, you can use the Azure Backup pricing estimator tool. Simply input details such as your data size, daily churn rate, and retention policy to calculate expenses.
If you're looking to manage and lower costs, consider these strategies:
- Opt for Locally Redundant Storage (LRS): Use this for storing non-critical data, as it's more cost-effective than geo-redundant options.
- Archive long-term data: Move data not frequently accessed into archive storage to save money.
- Commit to Reserved Capacity: Select 1- or 3-year Reserved Capacity plans for predictable savings.
- Exclude unnecessary disks: Avoid backing up disks that don't need protection.
- Use daily differential backups: For databases, differential backups can reduce storage costs while maintaining efficiency.
- Clean up deleted resources: Remove backups for resources that are no longer in use.
These tips can help you optimise your Azure Backup spending without compromising essential data protection.