How to Track Vendor Costs in Azure Billing
Learn how to effectively track vendor costs in Azure using cost management tools, tagging, and detailed reporting for better budget control.
Tracking vendor costs in Azure is essential for managing your cloud spending effectively. Here's how you can do it:
- Set Up Cost Management: Enable Azure Cost Management, configure cost views by subscriptions or vendors, and set alerts to avoid overspending.
- Tag Vendor Costs: Use tags like
VendorName,ServiceCategory, andProjectCodeto categorise expenses. Automate tagging with Azure Policy for consistency. - Analyse Costs: Use Azure's Cost Analysis tools to sort and filter expenses by tags, group resources, and monitor spending patterns.
- Build Reports: Automate daily, weekly, or monthly reports with tools like Power BI for visualising trends and budgets.
- Cut Costs: Optimise resources by rightsizing, analysing usage patterns, and setting spending limits.
- Integrate with Financial Systems: Export cost data via CSV, APIs, or Power BI to align with financial records for better reconciliation.
Quick Tip: Use Azure Advisor and the Cost Management API to identify inefficiencies and automate cost tracking.
FOCUS 1.0 for Azure FinOps cost management
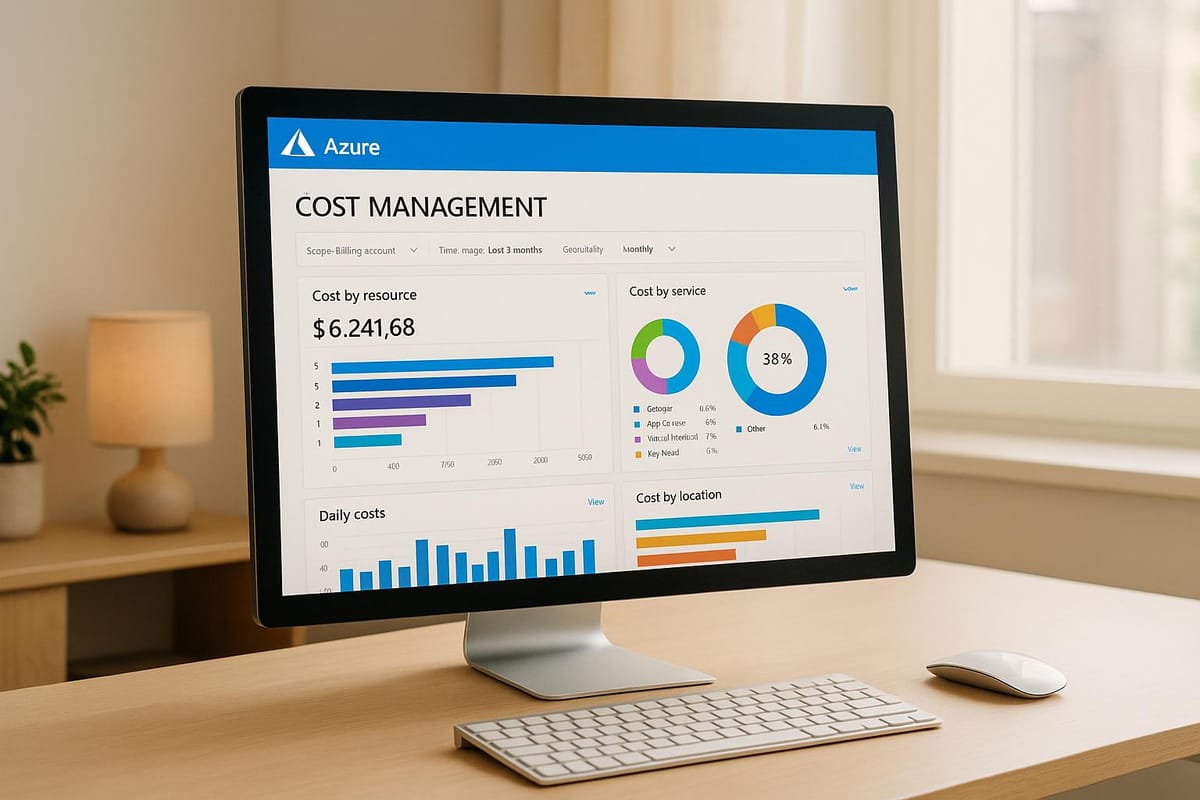
Azure Cost Management Basics
Azure Cost Management helps small and medium-sized businesses (SMBs) keep track of their spending in Azure, offering clear insights to spot areas where costs can be reduced.
Set Up Cost Management
Follow these steps to start monitoring vendor expenses:
-
Enable Cost Management
Log into the Azure portal, go to "Cost Management + Billing", and ensure you have Contributor permissions. -
Configure Cost Views
Create tailored cost views by:- Selecting specific subscriptions
- Setting time ranges
- Grouping costs based on vendors
- Scheduling regular reports
-
Establish Cost Alerts
Set up notifications, such as alerts at 80% of your monthly budget, to avoid overspending.
Read Vendor Cost Data
Azure Cost Management provides several ways to view vendor costs:
- Daily spending breakdowns
- Monthly summaries
- Reports for individual resources
These tools make it easier to track spending patterns, manage your budget, and find ways to cut costs. You can further refine your tracking by tagging vendor-related expenses.
Tag Vendor Costs
Using structured tagging is a smart way to track and manage vendor costs. It allows you to organise and analyse vendor expenses more efficiently. Start by setting up a clear tagging framework to categorise these expenses, then automate the process for consistency.
Create Vendor Tags
Establish a consistent tagging system to categorise resources tied to vendors. Here are some key tags to include:
- VendorName: Identifies the vendor (e.g., 'Contoso-Ltd', 'Fabrikam-Services').
- ServiceCategory: Specifies the type of service (e.g., 'DatabaseServices', 'SecurityMonitoring').
- CostCentre: Links costs to specific business units.
- ProjectCode: Associates expenses with particular projects.
- BillingCycle: Tracks billing periods (e.g., 'Monthly', 'Annual').
Automate Tag Rules
Manual tagging can lead to mistakes. To avoid this, use Azure Policy to enforce tagging rules:
1. Create an Azure Policy Definition
Go to Azure Policy and set up a new definition that mandates specific vendor tags. This ensures all new resources include the necessary attributes for cost tracking.
2. Set Up Automated Remediation
Configure Azure Policy to automatically apply missing tags. This keeps your tagging consistent and ensures all vendor costs are accounted for.
Example Tagging Structure
Here's a sample tagging framework:
| Resource Type | Required Tags | Example Values |
|---|---|---|
| Virtual Machines | VendorName, ServiceCategory, CostCentre | 'Contoso-Ltd', 'ComputeServices', 'IT-Operations' |
| Storage Accounts | VendorName, StorageType, BillingCycle | 'Fabrikam-Services', 'BackupStorage', 'Monthly' |
| Databases | VendorName, Environment, ProjectCode | 'DataVendor-Ltd', 'Production', 'PRJ-2025' |
Regular Auditing and Analysis
Use Azure Policy reports to audit your tags regularly. This helps you spot and fix any inconsistencies. Once vendor tags are properly enforced, you can integrate this data into Azure's cost analysis tools. This setup makes it easier to conduct detailed cost reviews and manage vendor expenses effectively.
Track Costs with Azure Tools
Azure provides tools to help you keep an eye on vendor expenses, analyse spending patterns, and make informed cost decisions.
Use Cost Analysis Features
Azure Cost Analysis includes features to sort and filter vendor-related expenses. Here's how you can use it:
- Tag-based filtering: Focus on specific supplier costs by selecting vendor tags.
- Resource grouping: Organise expenses by vendor services or projects.
- Time-range analysis: Spot unusual spending patterns across different billing periods.
The dashboard also allows you to create custom views, making it easier to monitor monthly spending and detect anomalies, such as unexpected billing issues.
Cost Breakdown
| Vendor Service Type | Monthly Cost (£) | YoY Change |
|---|---|---|
| Database Services | 12,500.00 | +15% |
| Security Monitoring | 8,750.00 | -8% |
| Backup Solutions | 5,250.00 | +22% |
These tools make it simple to track vendor spending and lay the groundwork for detailed cost reports.
Build Cost Reports
Once you've analysed the data, you can create detailed reports to better understand and manage vendor expenses.
-
Scheduled Reports: Automate daily, weekly, or monthly reports that include:
- Vendor cost trends
- Resource usage metrics
- Budget variance insights
- Spending forecasts based on current trends
- Power BI Integration: Bring vendor cost data into Power BI to create custom visualisations, set up automatic data updates, and share insights across your organisation.
- Custom Report Templates: Use pre-designed templates for specific reporting needs.
| Report Type | Metrics Included | Update Frequency |
|---|---|---|
| Executive Summary | Total vendor spend, budget variance, top cost drivers | Weekly |
| Detailed Analysis | Resource-level costs, usage patterns, cost-saving opportunities | Daily |
| Compliance Report | Tag compliance, budget adherence, policy violations | Monthly |
These reports provide a clear picture of vendor spending, helping you make informed decisions and stay on top of your budget.
Cut Vendor Costs
Use vendor cost data to identify areas where you can save money without lowering service quality. Tools like Azure Cost Management provide insights to help you manage budgets and make better use of resources.
Set Cost Limits
Create vendor-specific budgets based on past spending and future needs to avoid unexpected expenses. Set up tiered alerts to stay informed:
- At 50%, notify the team lead.
- At 75%, alert the department manager.
- At 90%, notify executives.
In addition to budgeting, improving how resources are used can lead to further savings.
Improve Resource Usage
Make better use of resources with these strategies:
-
Resource Rightsizing
Review usage patterns to spot and eliminate over-provisioned resources. Examples include virtual machines with low CPU usage, oversized databases, or unused storage. -
Usage Pattern Analysis
Regularly check consumption data for ways to save more. For instance, scale down resources during off-peak hours, remove duplicate backups, or archive rarely accessed data.
Connect to Financial Systems
Link your Azure vendor costs to financial systems to streamline expense tracking and keep records accurate.
Export Cost Data
Azure Cost Management offers multiple ways to export vendor cost data:
- CSV Export: Download cost data for use in spreadsheets or accounting software.
- REST API Integration: Automatically sync cost data using Azure REST APIs.
- Power BI Connection: Directly link Azure Cost Management to Power BI for customised financial dashboards that combine vendor costs with other metrics.
To automate exports, follow these steps:
- Go to Cost Management + Billing in the Azure portal.
- Click on Exports under Cost Management.
- Select Add and configure your export settings.
- Choose the recurrence frequency (daily, weekly, or monthly).
- Specify the file format and storage destination.
After exporting, ensure these figures align with your financial records for a complete and accurate view.
Match Financial Records
Aligning vendor costs with your financial records improves Azure cost management. Match costs like subscription fees, support charges, and usage-based expenses to the appropriate accounts. This ensures accurate reconciliation and more reliable financial reporting.
Azure Cost Tools and Resources
Azure provides a range of tools to help manage vendor-related expenses effectively. These tools go beyond traditional cost management practices, offering more detailed insights into vendor spending.
The Azure Cost Management portal acts as the central hub for tracking vendor expenses. Key features include:
- Cost Analysis Dashboard: Create customised views to monitor vendor spending patterns.
- Budget Alerts: Set up automated notifications to stay informed as costs approach predefined limits.
- Resource Recommendations: Get suggestions to help reduce unnecessary expenses.
For advanced control, the Azure Cost Management API allows you to:
| Feature | Benefit | Use Case |
|---|---|---|
| Programmatic Access | Automate tracking of vendor expenses | Maintain regular cost oversight |
| Custom Integration | Feed data directly into your systems | Sync with financial tools |
| Scheduled Reports | Generate automated expense reports | Simplify monthly cost analysis |
Azure Advisor adds another layer of insight by analysing your usage patterns and offering suggestions such as:
- Adjusting resource sizes to match actual needs.
- Identifying opportunities for reserved instances.
- Highlighting unused resources that can be eliminated.
By using these tools, you can identify inefficiencies in vendor spending and keep your costs aligned with your budget.
Azure Optimisation Tips, Costs & Best Practices
For more strategies on managing vendor costs, check out this in-depth blog. It covers practical methods for building cost-efficient cloud architectures, allocating resources effectively, improving security, and boosting performance.
This resource is particularly helpful for SMBs looking to scale their Azure infrastructure while keeping expenses under control. Visit Azure Optimization Tips, Costs & Best Practices for detailed advice tailored to your business goals.
Conclusion
Effectively tracking vendor costs starts with a solid cost management setup and using vendor tagging to categorise expenses accurately.
Azure provides tools that help organisations monitor spending patterns and allocate resources more effectively. When used correctly, these tools can help reduce costs and improve overall efficiency.
For SMBs expanding their Azure infrastructure, setting up robust tracking systems is key to keeping costs under control. Combining tagging strategies, automated monitoring, and regular reviews offers a reliable way to manage vendor-related expenses.
Vendor cost tracking is not a one-time task - it requires ongoing effort and adjustments. By using Azure's built-in tools and sticking to proven methods, organisations can stay transparent and optimise their cloud spending.
Balancing detailed tracking with practical cost-saving measures is the key to managing vendor costs in Azure. With the right strategies and tools in place, businesses can gain better control of their expenses while staying efficient.
FAQs
How can I accurately tag vendor costs in Azure for better tracking and management?
To ensure accurate tagging of vendor costs in Azure, use Azure Cost Management + Billing tools to create and apply consistent resource tags. Tags such as VendorName, ProjectCode, or CostCentre can help categorise expenses effectively. Make sure to establish a clear tagging policy across your organisation to maintain consistency.
Regularly review and update tags to ensure they remain relevant and align with your business needs. Additionally, leverage Azure's built-in cost analysis tools to monitor spending trends and identify opportunities for optimisation. This approach not only improves tracking accuracy but also enhances cost transparency and control.
How can I integrate Azure cost data with my existing financial systems effectively?
Integrating Azure cost data with your financial systems can help streamline expense tracking and enhance transparency. To achieve this effectively, consider using Azure Cost Management and Billing APIs to export cost data into your preferred financial tools. These APIs allow for automated data synchronisation, ensuring your financial records stay up to date.
Additionally, you can set up custom reports in Azure to align with your organisation's financial reporting structure. This helps you categorise vendor costs accurately and ensure compliance with your internal processes. For further insights on optimising Azure costs, explore expert tips and best practices tailored to SMBs scaling on Microsoft Azure.
How can I track and optimise vendor costs using Azure's billing tools?
Azure provides several tools to help you monitor and manage vendor-related expenses effectively. Cost Management + Billing is a powerful feature that allows you to analyse your spending, set budgets, and track costs by vendor or resource. You can use tags to categorise vendor-specific resources, making it easier to identify areas of inefficiency.
To optimise costs, review your spending patterns regularly and identify unused or underutilised resources. Consider implementing Azure Advisor recommendations for cost-saving opportunities. For more detailed guidance on cost management, explore best practices tailored to SMBs scaling on Azure.