Blob Storage Performance Tips for Batch Transfers
Speed up and cut costs for batch uploads to blob storage with tier selection, regional co-location, AzCopy tuning, client concurrency and monitoring.

Transferring large datasets to Azure Blob Storage can be challenging due to network latency, request throttling, and inefficiencies with small files. But with the right strategies, you can significantly boost performance and reduce costs.
Here’s what you need to know:
- Choose the right storage tier: Use Standard for infrequent access and Premium for high transaction rates or low-latency needs.
- Optimise data placement: Co-locate storage and compute resources in the same Azure region to minimise latency.
- Use AzCopy effectively: Configure parallel transfers, adjust block sizes, and break large jobs into smaller ones for smoother operations.
- Tweak client library settings: Adjust parameters like
max_concurrencyandmax_block_sizefor efficient uploads. - Monitor performance: Use Azure Monitor to track metrics like latency and throttling errors, and scale resources as needed.
Use azcopy to manage Azure Blob Storage - upload, download, sync, and more!
Selecting the Right Storage Tier for Batch Transfers
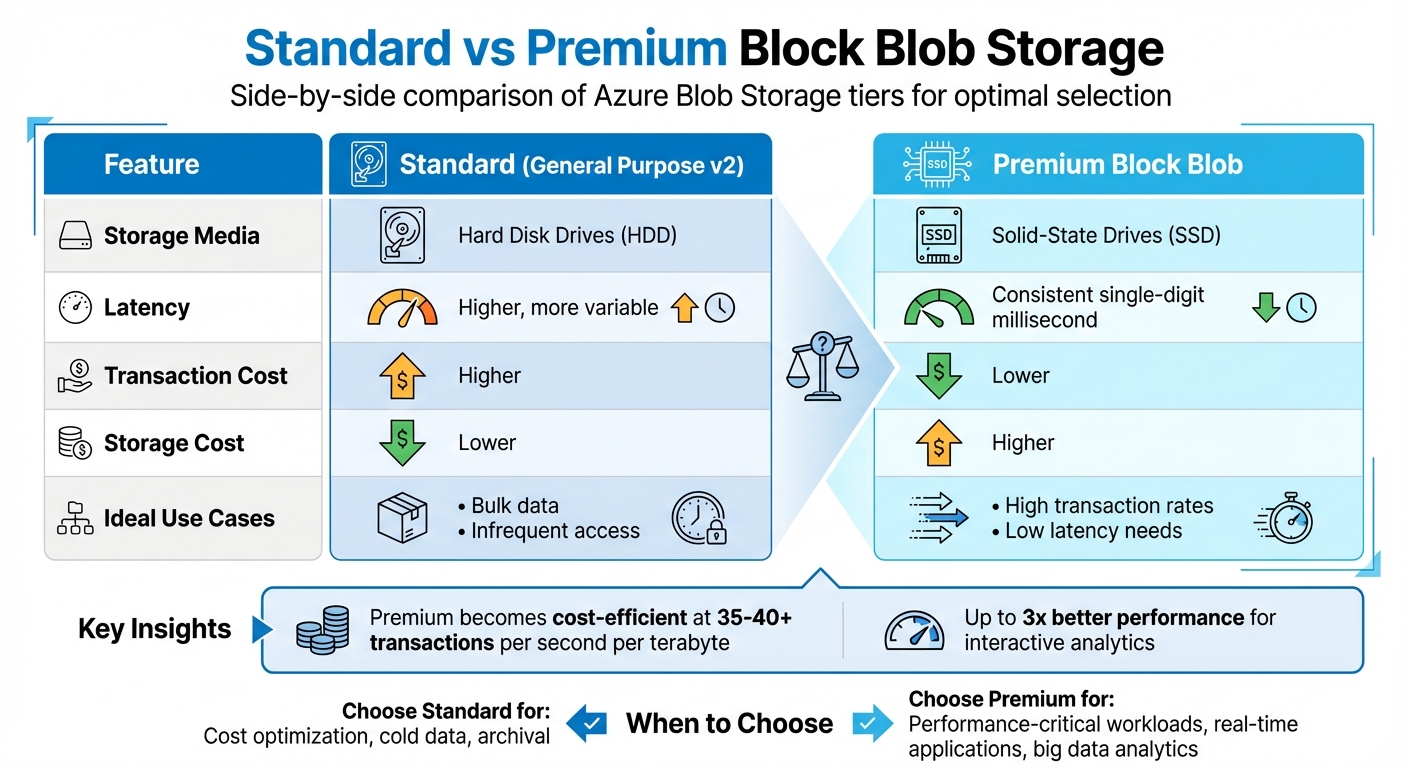
Azure Blob Storage: Standard vs Premium Performance Comparison
Azure offers two main Blob Storage tiers: Standard (HDD) for lower-cost storage with infrequent access, and Premium (SSD) for operations requiring high-frequency access and lower transaction costs. Choosing the right tier is critical for balancing transfer speed and cost in batch operations.
Standard storage is ideal for handling large data volumes that are accessed less often. While it has a lower cost per gigabyte, its transaction fees are higher. On the other hand, Premium storage has higher storage costs but significantly reduced transaction fees, making it a better option for batch jobs with frequent operations. In such cases, the savings on transaction costs can quickly outweigh the higher storage expense.
Standard vs Premium Storage Comparison
| Feature | Standard (General Purpose v2) | Premium Block Blob |
|---|---|---|
| Storage Media | Hard Disk Drives (HDD) | Solid-State Drives (SSD) |
| Latency | Higher, more variable | Consistent single-digit millisecond |
| Transaction Cost | Higher | Lower |
| Storage Cost | Lower | Higher |
| Ideal Use Cases | Bulk data, infrequent access | High transaction rates, low latency |
When to Use Premium Block Blob Storage
Premium storage is designed for workloads that demand high-frequency, low-latency operations. For example, if your workload involves more than 35–40 transactions per second per terabyte, Premium storage becomes the more cost-efficient choice. This makes it particularly suitable for batch scenarios involving frequent small writes, such as IoT telemetry ingestion or log aggregation.
In addition to its cost advantages, Premium storage delivers up to three times better performance for interactive analytics tasks. It’s also an excellent option for situations requiring rapid data hydration, such as rebuilding environments quickly from stored backups.
However, it’s essential to consider operational limitations. Premium block blob accounts only support block blobs and do not accommodate append blobs or page blobs. Before migrating, ensure that all necessary Blob Storage features are compatible with the Premium tier, as some features may have limited or no support compared to Standard storage.
Data Placement and Partitioning Strategies
Where and how you store your data can have a big impact on batch transfer performance. Beyond choosing the right storage tier, regional co-location and partitioning strategies play a key role in distributing workloads effectively and cutting down latency.
Co-locating Storage and Compute Resources
One of the simplest ways to improve performance is to keep your storage account in the same Azure region as your compute resources. Whether you're using virtual machines, Azure Functions, or Azure Batch nodes, this setup reduces network latency by keeping data transfers local. Azure's infrastructure is specifically designed to optimise performance within the same region.
The difference in performance between regions can be striking. Primary regions offer much higher rates for ingress, egress, and requests compared to others.
If your workload spans multiple regions, it's better to set up a separate storage account for each region instead of centralising everything in one place. For clients outside Azure, pick a region that's geographically closest to your on-premises setup to keep latency as low as possible. When moving data between accounts or containers, take advantage of server-to-server APIs like Put Block From URL. These keep data transfers within Azure's backbone network, saving bandwidth and speeding up operations.
Once you've nailed down resource placement, the next step is to optimise performance through smart blob naming.
Using Hash Prefixes for Partitioning
Azure Storage relies on partition naming to distribute workloads. Without a thoughtful naming strategy, you risk creating "hot partitions" - scenarios where too many operations hit the same backend server, leading to throttling. While co-location reduces latency, hash prefixing helps balance operations across partitions.
A common technique involves adding a three-digit hash sequence or a timestamp (like seconds) to the start of your blob names. For instance, instead of naming files sequentially (file001.dat, file002.dat), you could use names like a3f-file001.dat or b7c-file002.dat. This spreads operations more evenly across the system.
That said, there's an important exception to keep in mind. For blobs or blocks larger than 256 KiB, Azure automatically activates high-throughput block blobs. These blobs don't rely on partition naming for performance, so hash prefixing isn't necessary. Focus on this strategy only when working with smaller block sizes or older applications that can't handle larger blocks.
Improving Transfer Speeds with AzCopy
Once you've optimised data placement, the next step is to use AzCopy for efficient, high-speed data transfers. AzCopy is a command-line tool developed by Microsoft to manage large-scale transfers to and from Azure Blob Storage. While it's built to handle heavy workloads, achieving peak performance requires fine-tuning its settings, especially for parallel transfers and job sizes. With your data placement strategies in place, configuring AzCopy properly ensures the best results.
Configuring AzCopy for Parallel Transfers
The AZCOPY_CONCURRENCY_VALUE setting controls the number of simultaneous requests AzCopy makes. By default, machines with fewer than five CPUs use a concurrency value of 32, while those with five or more CPUs use 16 times the CPU count, capped at 300. However, for server-to-server transfers - where data moves directly between Azure storage accounts using the Put Block From URL API - you can safely increase this value beyond 1,000, as the data bypasses your local machine.
To optimise parallel transfers, use the azcopy benchmark command and set AZCOPY_CONCURRENCY_VALUE=AUTO to let AzCopy auto-tune this value.
Additionally, adjust the --block-size-mb parameter to values greater than 0.25 (256 KiB) to enable high-throughput block blobs, which improve ingestion speeds. You can use decimal fractions (e.g., 0.25 for 256 KiB) to fine-tune block sizes. To prevent your system from running out of memory during high-speed transfers, set the AZCOPY_BUFFER_GB parameter appropriately.
Best Practices for AzCopy in Batch Transfers
Once you've configured parallel transfers and block sizes, focus on job management and logging to maximise performance.
- Limit each job to fewer than 10 million files to minimise tracking overhead. For datasets exceeding 50 million files, tracking becomes a major bottleneck. Break these into smaller jobs using the
include-pathorinclude-patternflags. - For large-scale synchronisations, use
azcopy copywith the--overwrite ifSourceNewerflag instead ofazcopy sync. This approach skips the time-intensive scan of destination files. - When transferring batches of small files, disable post-transfer verification by setting
--check-length=false. Reduce logging overhead by using--log-level ERROR- both adjustments can significantly improve speed. - On Linux systems, where file scanning can be slow, increase
AZCOPY_CONCURRENT_SCANto fully utilise your network connection during the initial file discovery phase.
Tuning Client Library Settings for Batch Uploads
AzCopy is a powerful tool for command-line transfers, but many small and medium-sized businesses (SMBs) rely on client libraries like Python, .NET, or JavaScript to integrate with Azure Blob Storage. While these libraries come with default settings designed for stable data centre connections, optimising key parameters can significantly improve performance when uploading thousands of files or handling multi-gigabyte datasets. Proper tuning can boost throughput and reduce memory usage.
Key Transfer Parameters and Their Impact
Fine-tuning client library settings is just as important as optimising AzCopy. Three main parameters play a critical role in determining the efficiency of batch uploads: max_concurrency, max_block_size, and max_single_put_size.
| Parameter | Default Value | Impact on Batch Performance |
|---|---|---|
max_concurrency |
Varies (e.g., 5 in Go) | Controls the number of parallel connections. Higher values improve throughput but use more memory and system resources. |
max_block_size |
4 MiB | Specifies the chunk size for multi-part uploads. Smaller blocks reduce buffering and retry time, while larger blocks enhance throughput on reliable networks. |
max_single_put_size |
64 MiB | Sets the size limit for uploading blobs in a single request. Larger thresholds minimise the overhead of splitting medium-sized blobs into smaller parts. |
The max_concurrency parameter is especially important as it determines how many subtransfers the library performs simultaneously. In .NET environments, the default connection pool is limited - typically set to 2 for client applications and 10 for server environments. To achieve higher concurrency, you’ll need to increase the ServicePointManager.DefaultConnectionLimit to 100 or more. Without this adjustment, parallel transfers will remain restricted.
Adjusting Settings for Large Batch Jobs
When dealing with large-scale uploads, tweaking these parameters further can make a big difference.
For extensive batch uploads, ensure that max_single_put_size is at least equal to max_block_size. This ensures smaller blobs are uploaded in a single request, avoiding the added overhead of breaking them into multiple parts. For block blobs requiring high throughput, use block sizes larger than 4 MiB for standard storage or above 256 KiB for premium storage. However, if your network connection is less reliable - common in consumer or home environments - opt for smaller block sizes to reduce the amount of data buffered and retried during failures.
Microsoft emphasises: "Poorly tuned data transfer options can result in excessively long operations and even request timeouts. It's best to be proactive in testing these values, and tuning them based on the needs of your application and environment".
Keep in mind that block blobs have a maximum limit of 50,000 blocks. For very large files, you’ll need to adjust block size accordingly. For instance, transferring a 500 GiB file with a 4 MiB block size would exceed this limit. In such cases, increasing the block size to at least 10 MiB ensures you stay within the 50,000-block ceiling.
Monitoring and Scaling Batch Transfer Performance
Using Azure Monitor for Blob Metrics
To keep track of your batch transfer performance, Azure Monitor provides a useful toolset. Start by navigating to the Metrics section of your storage account. Select Blob as the sub-service and choose metrics like Ingress, Egress, or Transactions for detailed insights into your data flow. For active transfers, set the time granularity to 1 minute to observe real-time performance changes.
Pay close attention to Success E2E Latency and Success Server Latency metrics. The first includes total transfer time, factoring in network delays, while the second focuses solely on Azure's internal processing time. If you notice a large difference between these two, it often indicates client-side issues like CPU overload or network congestion, rather than Azure service problems. Use the ApiName dimension (e.g., PutBlob, PutBlock) to filter operations and identify throttling errors by checking ResponseType for ClientAccountBandwidthThrottlingError or ServerBusyError.
For a deeper dive, set up Diagnostic Settings to send logs to a Log Analytics workspace. This enables advanced analysis using Kusto queries. For example, you can identify operations with the highest latency using the following query:
StorageBlobLogs | where TimeGenerated > ago(3d) | top 10 by DurationMs desc | project TimeGenerated, OperationName, DurationMs, ServerLatencyMs, ClientLatencyMs = DurationMs - ServerLatencyMs.
However, keep in mind that high-volume transfers can lead to significant Log Analytics costs. To manage expenses, consider exporting logs to a separate storage account and analysing them occasionally with Azure Synapse serverless SQL pools.
Effective monitoring not only helps identify bottlenecks but also informs decisions about when to scale your infrastructure.
Scaling Strategies for Large Workloads
If monitoring data shows that a single client cannot handle your workload, scaling horizontally is a practical solution. Run multiple instances of AzCopy on separate virtual machines to distribute the workload. For server-to-server transfers, the AZCOPY_CONCURRENCY_VALUE can often be set above 1,000. However, AzCopy's job tracking can become inefficient for transfers exceeding 50 million files. To maintain performance, split large jobs into smaller ones, each handling fewer than 10 million files.
If your network bandwidth becomes a bottleneck, upgrading to larger virtual machines with higher bandwidth capabilities can help. Additionally, placing your storage accounts and compute resources within the same Azure region reduces latency and maximises bandwidth. For globally distributed, read-heavy workloads, tools like Azure Front Door or a content delivery network can lower egress costs and improve latency by caching data closer to users.
To handle errors like 503 or 500 at scale, implement exponential backoff retries with intervals such as 2, 4, 10, and 30 seconds. This approach ensures smoother operations during high-demand periods.
Conclusion
Getting the most out of Azure Blob Storage for batch transfers requires smart planning and execution. Keeping your storage accounts and compute resources in the same Azure region helps reduce network delays and boosts bandwidth efficiency. For workloads with high transaction rates, Premium block blob storage offers consistent, low-latency performance in the single-digit millisecond range.
When it comes to bulk transfers, AzCopy is your go-to tool, but its performance hinges on proper configuration. Running azcopy benchmark before large jobs can pinpoint potential bottlenecks. For jobs exceeding 50 million files, tracking overhead can become a major issue, so it's better to keep individual jobs under 10 million files for smoother operation. Additionally, setting the --log-level to ERROR can minimise the performance hit from excessive logging during large transfers.
If you're building custom applications, similar tuning principles apply. Adjusting client library settings, such as increasing MaximumConcurrency and setting ServicePointManager.DefaultConnectionLimit to 100 or more, helps prevent connection pooling bottlenecks. For moving data between containers or accounts, server-to-server APIs are an efficient choice, as they avoid the need to download and re-upload data.
To stay ahead of potential issues, Azure Monitor is an invaluable tool for spotting throttling events and latency problems early. Using exponential backoff retries ensures smoother operations even during periods of high demand.
Cost efficiency is another key benefit of these strategies. For predictable workloads, reserving Azure Storage capacity can cut costs by up to 38%. Meanwhile, lifecycle management policies can automatically shift older blobs to cooler storage tiers, further optimising expenses. For more detailed guidance on managing Azure costs and performance, check out Azure Optimization Tips, Costs & Best Practices.
FAQs
Should I use Standard or Premium Blob Storage for batch data transfers?
When deciding between Standard and Premium Blob Storage, it all comes down to balancing performance needs and costs.
Standard Blob Storage is a great option if you're looking for affordable, scalable storage. It’s well-suited for general-purpose batch transfers where ultra-fast performance or very low latency isn’t a priority.
If your workload requires high transaction rates, low latency, or consistent performance, especially for smaller files, then Premium Blob Storage is the better choice. It’s ideal for scenarios where frequent access or time-sensitive operations are key.
Think carefully about your workload requirements and budget to choose the option that fits your needs.
How can I improve batch transfer speeds using AzCopy with Azure Blob Storage?
To get the best batch transfer speeds with AzCopy, begin by using the azcopy benchmark command. This will help you spot potential bottlenecks and adjust settings to improve performance.
You can fine-tune factors like environment variables and transfer options to strike the right balance between speed and resource usage. Adjusting parameters such as concurrency and block size can make a noticeable difference in efficiency. Make it a habit to review your configurations regularly, ensuring they match your workload demands and system capabilities.
How can I track and enhance the performance of batch transfers with Azure Monitor?
To keep an eye on and fine-tune batch transfers in Azure Blob Storage, take advantage of Azure Monitor. It allows you to track essential metrics such as transaction volume, throughput, and latency. For more in-depth analysis, tools like Storage Insights offer detailed dashboards that can highlight bottlenecks or underused storage accounts, giving you the data you need to make smarter decisions.
To boost performance, focus on optimising upload and download processes. Adjust block sizes, enable parallel transfers, and make use of tools like AzCopy with its recommended settings. By consistently reviewing these metrics, you can ensure your tweaks are working as intended, helping to maintain efficient and cost-effective batch operations. Sticking to Azure Blob Storage best practices will also enhance transfer speeds and reliability.