Azure AD SSO Setup for Hybrid Environments
Step-by-step guide to configure Azure AD Connect, enable Hybrid Azure AD Join and Seamless SSO, plus security and troubleshooting tips.

Azure Active Directory Single Sign-On (SSO), now part of Microsoft Entra, simplifies user access by eliminating repeated password prompts for cloud and on-premises apps. It uses Kerberos tickets for authentication and works seamlessly with Password Hash Synchronisation (PHS) or Pass-through Authentication (PTA). This guide covers setting up Azure AD Connect, enabling Hybrid Azure AD Join, and configuring SSO for a streamlined hybrid identity experience.
Key Takeaways:
- Benefits: Automatic access to apps, reduced IT workload, and enhanced security with Conditional Access and Multi-Factor Authentication (MFA).
- Prerequisites: Windows Server 2016+, .NET Framework 4.5.1+, routable UPN suffix, and outbound HTTPS access.
- Setup Steps:
- Install and configure Azure AD Connect.
- Enable Hybrid Azure AD Join for domain-joined devices.
- Configure Seamless SSO for password-free access on supported devices.
- Verification: Use tools like
dsregcmd /statusand the Microsoft Entra admin centre to confirm proper synchronisation and device registration.
This article provides a step-by-step guide to configuring and securing Azure AD SSO in hybrid environments, ensuring smooth integration between on-premises and cloud systems.
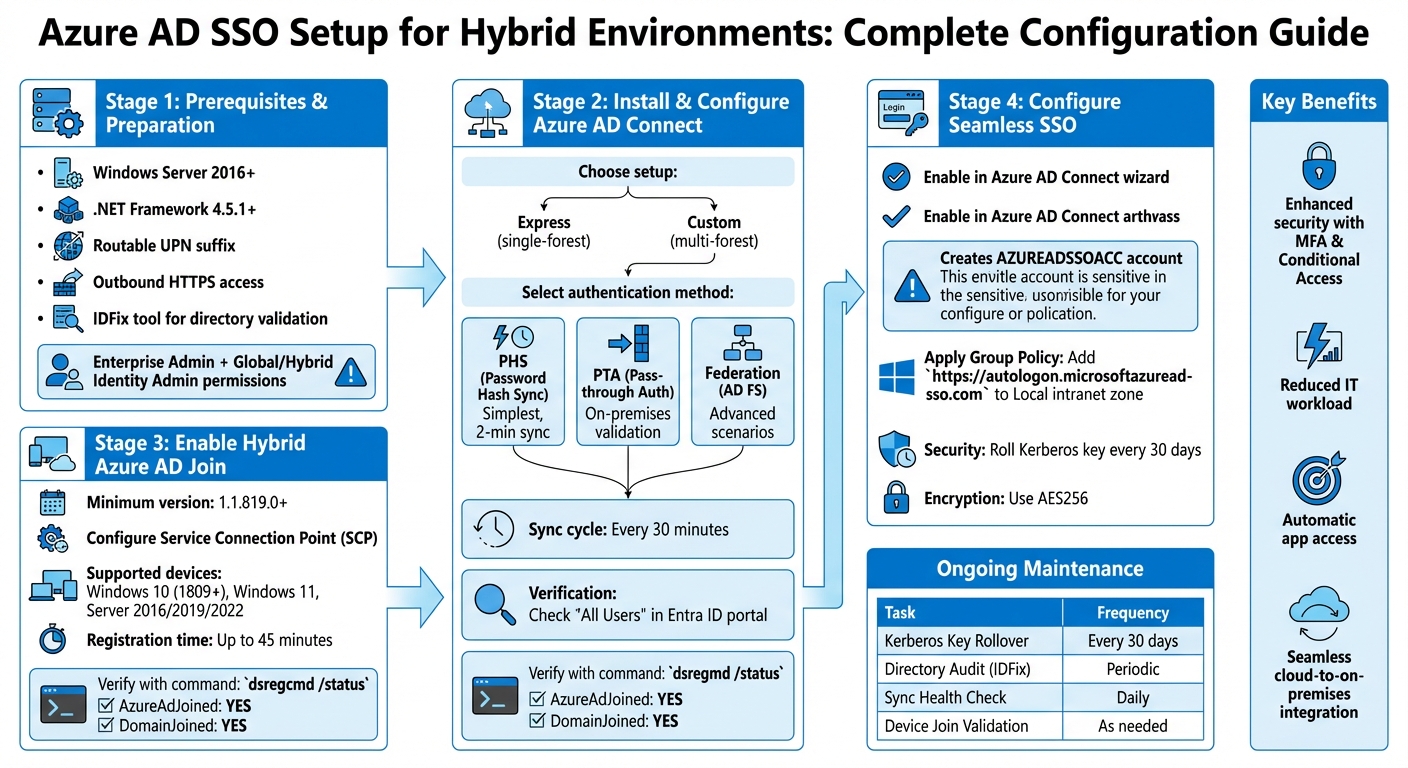
Azure AD SSO Setup Process for Hybrid Environments - 4 Key Configuration Steps
Deep Dive: Seamless Single Sign-On Hybrid Azure Active Directory
Setting Up Azure AD Connect for Hybrid Identity
Azure AD Connect, now known as Microsoft Entra Connect, serves as the link between your on-premises Active Directory and Azure AD. When set up correctly, it ensures that users, groups, and devices are synchronised seamlessly across both environments. Here's a detailed guide to installing and configuring Microsoft Entra Connect.
Installing Azure AD Connect
Start by using a domain-joined Windows Server that meets all the necessary prerequisites. Before running the installer, use the IDFix tool to check your on-premises directory for any attribute errors, duplicate entries, or invalid characters that could interfere with synchronisation. It's also a good idea to enable the Active Directory Recycle Bin in your forest before proceeding.
For the initial setup, you'll need Enterprise Admin permissions for your on-premises environment and either a Global Administrator or Hybrid Identity Administrator account for Microsoft Entra. Treat this server with the same level of security as a domain controller - restrict local logins to only essential personnel.
Configuring Synchronisation Options
During installation, you'll choose between two main setup options: Express Settings or Custom Settings.
- Express Settings: Best suited for single-forest environments, offering a streamlined setup.
- Custom Settings: Required for multi-forest environments or when specific authentication methods are needed.
You’ll also need to select an authentication method. The key options are:
- Password Hash Synchronisation (PHS): This synchronises a hash of the user's password to the cloud, providing a straightforward setup with built-in features like leaked credential detection.
- Pass-through Authentication (PTA): Validates passwords directly against your on-premises Active Directory through a lightweight agent, ideal for organisations enforcing on-premises security policies.
- Federation: Delegates authentication to an on-premises server, such as AD FS, and is typically used in more complex scenarios requiring advanced authentication methods.
If you're handling large groups, the V2 endpoint can improve synchronisation speeds significantly - up to 10 times faster. Once you've configured your synchronisation settings, it's important to verify that everything is working as expected.
Verifying Synchronisation
By default, synchronisation cycles occur every 30 minutes. A successful sync means users will appear in the "All Users" section of the Microsoft Entra ID portal, with their source listed as "Windows Server AD". To confirm the process on the server, open the Synchronisation Service Manager and check the Import, Synchronisation, and Export steps - each should show a "Success" status.
For device verification, use the command dsregcmd /status on a domain-joined workstation. Look for these outputs:
- AzureAdJoined: YES
- DomainJoined: YES
These indicate successful registration. If devices aren't appearing in Azure AD, ensure that the organisational units (OUs) containing computer objects are selected for synchronisation in the Azure AD Connect configuration. Keep in mind that new computer accounts may take around 45 minutes to sync to Entra ID.
Enabling Hybrid Azure AD Join
Once Microsoft Entra Connect is successfully synchronising, the next step is to enable Hybrid Azure AD Join. This feature lets your domain-joined Windows devices register with Microsoft Entra ID while staying connected to your on-premises Active Directory. The result? Users get seamless access to both on-premises and cloud-based resources.
Before you dive in, check that you're running Microsoft Entra Connect version 1.1.819.0 or later. You'll also need Hybrid Identity Administrator credentials for your Entra tenant and Enterprise Administrator credentials for every Active Directory forest involved. Supported devices include Windows 10 (version 1809 or later), Windows 11, and Windows Server versions 2016, 2019, and 2022.
Configuring the Service Connection Point (SCP)
The Service Connection Point (SCP) is an object in your on-premises Active Directory that tells your devices which Entra tenant to register with. The easiest way to set this up is through the Microsoft Entra Connect wizard. Here's how:
- Open the wizard and go to Additional tasks > Configure device options > Configure Hybrid Azure AD join.
- When prompted, select your forest and the appropriate authentication service.
For environments using Password Hash Synchronisation or Pass-through Authentication, choose Azure Active Directory. If you're using federated authentication with AD FS, select AD FS. You'll need Enterprise Administrator credentials to create the SCP in your Active Directory's Configuration naming context.
If you're managing multiple forests or want to roll out the feature gradually, you can skip the SCP setup in Active Directory. Instead, use Group Policy to deploy registry keys directly to the devices you want to include. Add the keys at:
HKLM\SOFTWARE\Microsoft\Windows\CurrentVersion\CDJ\AAD
using your TenantId and TenantName values. This method works particularly well for pilot testing before rolling out Hybrid Azure AD Join across your entire environment. Once the SCP is configured, select the authentication method that best suits your needs.
Choosing Authentication Methods
Your choice of authentication method determines how users and devices verify their identity with Microsoft Entra ID. The main options are Password Hash Synchronisation (PHS), Pass-through Authentication (PTA), and Federated Authentication via AD FS.
- Password Hash Synchronisation (PHS): The simplest option, requiring minimal setup beyond Entra Connect. It synchronises password hashes to the cloud every two minutes, with Microsoft Entra ID handling authentication. This is a solid choice for most organisations and supports features like leaked credential detection through Microsoft Entra ID Protection.
- Pass-through Authentication (PTA): This method validates passwords directly against your on-premises Active Directory using lightweight agents. Passwords never leave your network, and on-premises policies (e.g., sign-in hours, account lockouts) are enforced immediately. For reliability, Microsoft recommends deploying at least three agents.
- Federated Authentication: This option uses AD FS and requires dedicated server infrastructure. It's ideal for organisations with specific needs, such as third-party multi-factor authentication or authentication using sAMAccountName instead of a UPN. If you choose PTA or Federation, enabling PHS as a backup is a good idea to maintain access during on-premises outages.
Once you've selected and configured your authentication method, it's time to verify that devices are successfully registering.
Validating Hybrid-Joined Devices
After setup, devices may take up to 45 minutes to register. To confirm that a device has joined successfully, open the command prompt on the device and run:
dsregcmd /status
Look for AzureADJoined: YES and DomainJoined: YES in the output.
You can also check the Microsoft Entra ID portal. Go to Devices > All devices and look for your hybrid-joined devices. The join type should display as "Hybrid Azure AD joined." If devices don’t appear, ensure that the organisational units containing your computer objects are included in the synchronisation scope of Microsoft Entra Connect.
Lastly, make sure that traffic to these URLs is excluded from any SSL/TLS inspection on your network, as such inspection can disrupt the client certificate authentication process during device registration:
https://device.login.microsoftonline.comhttps://enterpriseregistration.windows.net.
Configuring Seamless Single Sign-On (SSO)
After setting up hybrid join, the next step is to configure Seamless Single Sign-On (SSO). This feature allows users to access both on-premises and cloud applications without needing to re-enter passwords, creating a unified and smooth experience. It complements the hybrid identity setup you've already established.
With Hybrid Azure AD Join in place, enabling Seamless Single Sign-On removes password prompts for users on domain-joined devices. Seamless SSO works with either Password Hash Synchronisation (PHS) or Pass-through Authentication (PTA), but it doesn’t support Active Directory Federation Services (ADFS). While Windows 10 and newer systems typically rely on Primary Refresh Token (PRT) for SSO, Seamless SSO is especially suitable for older devices running Windows 7 or 8.1.
Enabling Seamless SSO in Azure AD Connect
To enable Seamless SSO, open the Microsoft Entra Connect wizard and select Change user sign-in. Tick the box for Enable single sign-on and enter Domain Administrator credentials for each on-premises Active Directory forest. This process creates the AZUREADSSOACC account, which handles Kerberos ticket authentication. Securing this account is critical and will be covered in the next section.
Once enabled, check the status in the Microsoft Entra admin centre under Entra ID > Entra Connect > Connect sync. The field for "Seamless single sign-on" should show as Enabled. If you’re managing multiple domains per forest or have other specialised requirements, you can also enable Seamless SSO using the AzureADSSO.psd1 PowerShell module. After enabling, take the necessary steps to secure the AZUREADSSOACC account.
Securing the AZUREADSSOACC Account
The AZUREADSSOACC account contains the Kerberos decryption key, making its security a top priority. If this key is compromised, attackers could generate Kerberos tickets to impersonate synchronised users during Entra ID sign-ins. To protect the account, move it to a dedicated Organisational Unit (OU) that’s protected from accidental deletion and accessible only by Domain Admins. Disable Kerberos delegation for this account and restrict delegation permissions to Domain Admins.
Microsoft advises refreshing the Kerberos decryption key every 30 days. Use the Update-AzureADSSOForest PowerShell cmdlet to perform this update. For stronger security, manually configure the msDS-SupportedEncryptionTypes attribute to use AES256 encryption. While Seamless SSO supports AES256, AES128, and RC4, AES256 is the preferred choice. If your current setup uses RC4, make sure to refresh the key before switching encryption types to avoid any authentication issues.
Applying Group Policies for SSO
To finalise the setup, apply Group Policies to ensure browsers send Kerberos tickets to the appropriate endpoint. By default, browsers won’t send Kerberos tickets to cloud endpoints unless explicitly configured. Add https://autologon.microsoftazuread-sso.com to the browser’s local intranet zone using the Site to Zone Assignment List policy. You can find this setting under User Configuration > Policies > Administrative Templates > Windows Components > Internet Explorer > Internet Control Panel > Security Page. Enable the policy and assign the URL a value of 1 (indicating the Intranet zone).
Additionally, enable Allow updates to status bar via script under User Configuration > Policies > Administrative Templates > Windows Components > Internet Explorer > Internet Control Panel > Security Page > Intranet Zone. For Google Chrome or Microsoft Edge, if you’ve customised the AuthNegotiateDelegateAllowlist or AuthServerAllowlist, make sure to include the Seamless SSO URL. Mozilla Firefox users should configure this URL in the SPNEGO section of their authentication policy settings.
If Group Policy isn’t applied or fails, Seamless SSO operates in an "opportunistic" mode. In this case, the system defaults to regular sign-in behaviour, prompting users for their passwords. These configurations complete the SSO setup, ensuring a streamlined experience for your hybrid environment.
Testing and Verifying SSO Configuration
Once your configurations are in place, it’s time to ensure Seamless SSO is working as expected. Start by checking the status of the feature using PowerShell. Load the AzureADSSO.psd1 module on your Azure AD Connect server and run Get-AzureADSSOStatus. This will display all Active Directory forests where Seamless SSO is enabled.
Testing SSO Functionality
To confirm Azure AD join and PRT (Primary Refresh Token) presence, run dsregcmd.exe /status on a domain-joined machine.
For browser-based validation, visit https://myapps.microsoft.com or https://myapps.microsoft.com/contoso.com (for tenant-specific testing). Users should only need to enter their username. If everything is configured correctly, they’ll be signed in automatically without needing to input credentials. This confirms Kerberos tickets are being forwarded properly.
If you’re testing with Azure Virtual Desktop (AVD) and encounter repeated prompts for credentials, check that the SsoadfsAuthority property does not include a trailing slash.
Checking Synced Devices and Users
In the Microsoft Entra admin centre, navigate to Entra ID > Entra Connect > Connect sync. Ensure that "Seamless single sign-on" is marked as Enabled. Review the Devices and Users sections to confirm the hybrid join status, operating system details, last activity timestamps, and attribute accuracy.
For those with a Microsoft Entra ID P1 or P2 licence, the Sign-in Activity Reports are a valuable tool. These reports provide detailed error codes that can pinpoint why SSO might be failing. On domain controllers, enable success auditing and monitor for Event ID 4769 tied to the AzureADSSOAcc$ computer account. This will confirm that Kerberos service ticket requests are being processed.
Troubleshooting Common Issues
One of the most common errors is misplacing https://autologon.microsoftazuread-sso.com in the "Trusted sites" zone instead of the "Local intranet" zone. This mistake blocks sign-ins, so double-check your Group Policy settings if users encounter authentication issues.
In December 2021, Microsoft Customer Engineer Daniel Carroll addressed a recurring Azure Virtual Desktop SSO issue where users were unexpectedly prompted for credentials after ADFS authentication. By analysing AD FS Admin event logs with a specific Correlation ID, the team identified an "invalid_client" error (MSIS9622). The problem stemmed from a trailing slash in the SsoadfsAuthority property (https://sts.contoso.com/ADFS/ instead of https://sts.contoso.com/ADFS). Using the Update-AzWvdHostPool cmdlet to remove the slash resolved the issue instantly.
Kerberos ticket size can also cause problems. If a user belongs to too many Active Directory groups, the Kerberos ticket might exceed the 50 KB limit for Microsoft Entra HTTPS requests. Most tickets range from 2 KB to 5 KB, but larger tickets nearing 50 KB can fail authentication. Use klist to view existing Kerberos tickets and klist purge to clear cached ones if needed. Cached tickets are generally valid for 10 hours, so forcing a fresh request can resolve intermittent issues.
Time synchronisation is another critical factor. Devices must be synchronised within five minutes of the domain controllers for Kerberos authentication to work. Check that all devices and domain controllers are using the same time source. Additionally, ensure the AZUREADSSOACC computer account exists and is enabled in each AD forest. If it’s been deleted or the Kerberos decryption key is out of sync, SSO will fail completely.
| Sign-in Error Code | Failure Reason | Resolution |
|---|---|---|
| 81001 | Kerberos ticket too large | Reduce the user’s AD group memberships. |
| 81010 | Expired or invalid ticket | Ensure the user is on a domain-joined device within the corporate network. |
| 81011/81013 | User object not found | Verify the user is synchronised via Microsoft Entra Connect. |
| 81012 | User mismatch | Confirm the user signed into the device matches the one signing into Entra ID. |
For Internet Explorer users, make sure "Enhanced Protected Mode" is disabled in the browser settings, as it can disrupt Seamless SSO. If necessary, you can reset the feature by importing the AzureADSSO.psd1 module and running Disable-AzureADSSOForest followed by Enable-AzureADSSOForest. Keep in mind that enabling Seamless SSO can take up to 30 minutes to propagate, so allow enough time for changes to take effect. If issues persist, follow the troubleshooting steps outlined above.
Conclusion and Next Steps
Setting up Azure AD Single Sign-On (SSO) for hybrid environments involves careful planning. By configuring AD Connect, hybrid join, and Seamless SSO, you lay the groundwork for a smooth authentication process. However, maintaining this setup requires consistent attention and proactive management. Below, we've summarised the key points and outlined steps for ongoing maintenance.
Key Takeaways
The AZUREADSSOACC computer account is at the heart of your Seamless SSO setup. To safeguard this account, restrict its management to Domain Admins and place it in a dedicated organisational unit. Enhance its security by disabling Kerberos delegation and upgrading its encryption to AES256_HMAC_SHA1.
Regular upkeep is crucial. Microsoft advises rolling over the Kerberos decryption key for the AZUREADSSOACC account at least every 30 days. Additionally, use the IDFix tool to routinely audit your directory for duplicate attributes, such as proxyAddress or userPrincipalName, to prevent synchronisation issues. Monitor the Azure AD Connect Health portal daily and check the Application log on your Azure AD Connect server for Event ID 4, which confirms successful synchronisation cycles.
Additional Resources
Looking for more ways to enhance your cloud environment? Check out the Azure Optimisation Tips, Costs & Best Practices blog. It provides actionable advice on architecture, security, and cost management, specifically for SMBs scaling on Microsoft Azure.
Maintaining Your SSO Configuration
To keep your SSO setup secure and efficient, establish a regular maintenance routine. Here's a quick reference table for key tasks and their recommended frequency:
| Maintenance Task | Frequency | Tool/Method |
|---|---|---|
| Kerberos Key Rollover | Every 30 days | PowerShell / Microsoft Entra Connect |
| Directory Attribute Audit | Periodic | IDFix Tool |
| Sync Health Check | Daily | Azure AD Connect Health Portal |
| Device Join Validation | As needed | dsregcmd /status |
Keep your Azure AD Connect installation up to date to ensure access to the latest security patches and features. Strengthen your SSO environment by enabling Multi-Factor Authentication (MFA) for all administrator and user accounts. Lastly, use Group Policy to add https://autologon.microsoftazuread-sso.com to your Local intranet zone.
FAQs
Which sign-in method should I choose: PHS or PTA?
Password Hash Synchronisation (PHS) and Pass-through Authentication (PTA) are two methods that help integrate on-premises Active Directory with Azure AD, each serving distinct needs.
PHS works by syncing password hashes from your on-premises Active Directory to Azure AD. This enables a simpler setup process and supports a "same sign-on" experience for cloud services. It’s a straightforward solution for organisations prioritising ease of use.
On the other hand, PTA validates user passwords directly against the local Active Directory in real time. This means no passwords or password hashes are stored in the cloud, making it a better fit for environments where security and real-time validation are top priorities.
Choose PHS if you want simplicity, or opt for PTA if your focus is on enhanced security without cloud-based password storage.
Why are my devices not showing as Hybrid Azure AD joined?
Devices might not show up as Hybrid Azure AD joined due to a few typical problems. To address this, check the following:
- Ensure the Organisational Units (OUs) containing your devices are part of the Azure AD Connect synchronisation process.
- Confirm that the Device Registration Service (DRS) SCP is properly set up in Active Directory.
- For older devices, verify that Microsoft Workplace Join is installed and Seamless SSO is configured if required.
- Make sure the SYSTEM context has internet access to the necessary URLs.
Additionally, confirm that synchronisation is functioning correctly and that device registration is fully completed to resolve any remaining issues.
How do I secure and rotate the AZUREADSSOACC key?
To maintain security for Azure AD Seamless SSO, it's important to rotate the AZUREADSSOACC Kerberos decryption key regularly - ideally every 30 days. Ensure the AZUREADSSOACC account is placed in a secure Organisational Unit (OU) with restricted access permissions. Additionally, disable Kerberos delegation on this account to minimise potential risks. Automating the key rotation process is a smart approach, especially in environments with higher complexity. These steps align with Microsoft's security guidelines and help maintain a strong security posture.